Table of Contents
*This post may contain affiliate links. As an Amazon Associate we earn from qualifying purchases.
Your bike goes through a lot of wear and tear.
That’s okay. Bikes are designed to withstand all kinds of conditions and rides.
Still, you need to give your bike the love and care it deserves. It treats you well so you should take care of it, too.
It’s especially important to pay special attention to your brakes and bike brake pads. The last thing you want is to have your brakes go out when you need them most, right?
Don’t worry, it’s incredibly easy to learn how to tighten bike brakes and how to adjust bike brakes. As for how to fix bike brakes on your own? You might want to seek the help of a professional.
Caring for bike brake pads: things to know before getting started
It’s always important to keep a few things in mind before you mess with a vital part of your bike like your brakes.
Clean everything up
No one wants to work on a dirty and grimy bike. When it comes to your brakes, it’s especially important to make sure everything is clean before you get started.
You don’t want dirt and dust working its way into your brake system to cause friction and reduce your brakes’ integrity. Make sure you use a dedicated brake cleaner. Degreasers and other cleaning solutions can destroy your brake discs.
Test everything out when you’re done
It’s impossible to stress enough how important your brakes are for keeping you safe while riding. You want to make sure everything works correctly before you find yourself without brakes going down a busy hill.
After you’ve completed any brake tune ups or repairs, test them out at low speeds in your driveway or near your home away from traffic.
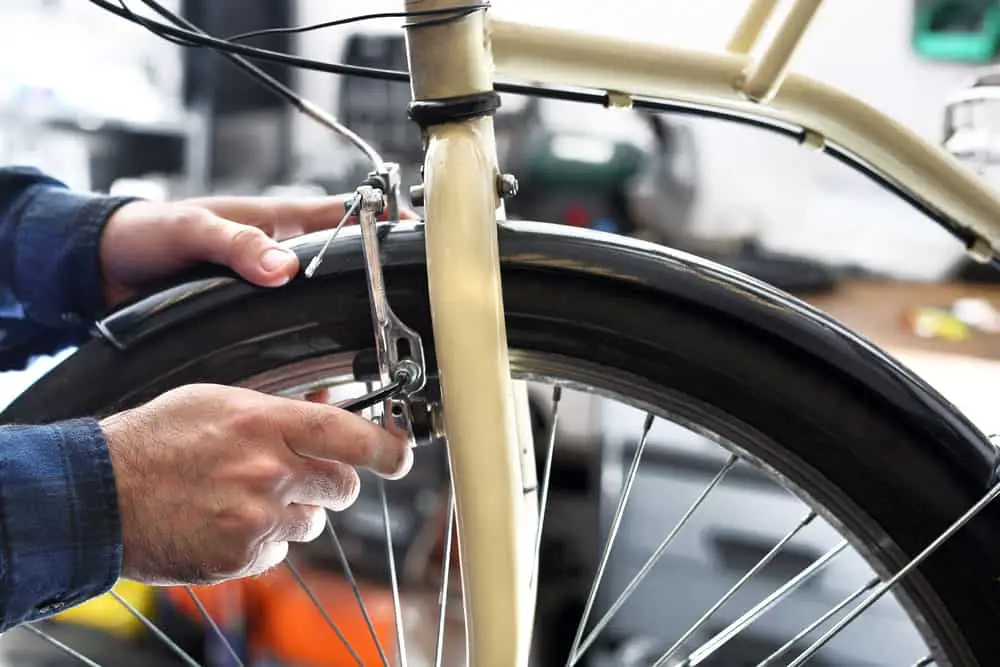
Understanding bike brake pads and other parts
- Pull lever: This is what you pull while riding to engage the brake.
- Calipers: Just like on your car, brake calipers on your bike grip your bike brake pads to stop the bike.
- Brake pads: The soft, rubbery part that touches the wheel rim.
- Cable and cable housing: The cable attaches the pull lever to the brake calipers. This cable is enclosed in a cable housing to protect it from breaking.
- Adjustment knob: This piece adjusts the tension of your brake cable and housing.
- Lock nut: Keeps the adjustment knob in the correct place.
- Boot: Protects your brake system from dirt, grime, and contamination that can throw off your brakes’ integrity.
How to adjust bike brakes
Adjusting bike brakes is pretty simple on your own but it’s even easier if you have a friend nearby to help.
- Completely unscrew the lock nut.
- Squeeze the calipers against the wheel rim with your hand.
- Unscrew the adjustment knob nearly all the way.
- Try out your brake pull lever. If it doesn’t engage the brake as it should…
- Gently hold the brake lever as you screw the adjustment knob back into an ideal setting.
- Test different adjustments to see what works for you.
- Screw the lock nut back into place.
- When you’re ready, get on the bike and test the brakes.
How to fix bike brakes
“How to fix bike brakes” is a loaded statement without one right answer.
Which part of your brakes needs a fix? The calipers? Bike brake pads? Cable?
First you need to identify which part is broken. Keep in mind it could be multiple parts. If you’ve already tried adjusting your brake tension and that didn’t solve your problems, you might need to replace your brake cables.
If you need a new brake cable, it’s possible to do this job on your own but I would recommend visiting a shop. It’s difficult to do this on your own and you could end up screwing up the rest of your brake system.
Calipers and bike brake pads are a little easier to repair on your own so there’s no reason you can’t give that a shot. Still, each bike is different. You’ll need to find the right calipers for your particular bike. Each bike needs calipers to be a certain length from the while rim and brake pads.
Your best bet is to refer to YouTube videos for your bike make and model to make sure you do the job correctly. Remember: you really do not want to screw up your brakes. When in doubt, bring your bike into the shop or simply give them a call to ask some questions.
How to fix squeaky bike brakes
This one’s pretty simple. You’ll need to locate the screw for each brake. It’s usually near the boot a few inches above the calipers.
Find a wrench and tighten the screw on each brake. Give the new brakes a test run and tighten or loosen as needed.
